Sales pros and revenue producers – there is a free time-saving tool that works well with LinkedIn and Sales Navigator. Spend a few minutes and it will save you many hours.

Auto Text Expander will help you engage your top targets on LinkedIn with customized responses based on designed templates. It turns your Inbox and profile visitors into appointments.
It’s essentially a web-based text pasting tool. There are multiple versions:
- Windows and Mac
- Free version for Google Chrome
- Downloaded application
Google Extension
This post covers the free web-based tool that includes a Chrome Browser extension.

So, gather up your LinkedIn messages for your specific audiences in a Google Doc or a Word file. You might have 5-10 messages total. I have 40-50 customized messages.
- Connection requests
- Welcome messages for new connections
- Messages to profile visitors
- Messages to your base of connections
Don’t have messages ready? Continue with the install process and come back. Best to write the actual message text in a Google Doc or Word file and then copy/paste it into the tool.
Fire Up Auto Text Expander

Find Auto Text Expander in the Google chrome web store or click on this link. Once installed, it loads up your dashboard with your messages and their triggers.
The dashboard is essentially a web page that matches up with the Chrome Extension running on your browser. Messages are stored in the cloud and the local Chrome extension pastes them into LinkedIn message “boxes” with a simple trigger like “;;a” in this example.
Connection Request entry:

Welcome Message entry:

I suggest a 3 character pattern when naming your triggers. Your trigger goes on the left and copy/paste your message text into the boxes at the right. Save it to the cloud and you are ready. SUPER simple.

Send Connection Request Messages with Auto Text Expander
Now you are ready to use Auto Text Expander. My most common uses are for things like connections requests, messages and even replies.
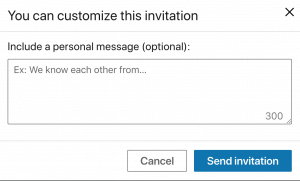
For example, when sending connection requests to new people, you might click CONNECT on their profile, proceed to “add a message” to make the most out of the opportunity.

Just enter the trigger (e.g. “;;a”) to paste in the message text from the cloud. It’s super fast. You MUST enter the trigger very quickly.
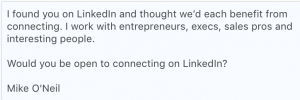
I found you on LinkedIn and thought we’d each benefit from connecting. I work with entrepreneurs, execs, sales pros and interesting people. Would you be open to connecting on LinkedIn?
Mike O’Neil
Personalizing Messages with Auto Text Expander
Create a stronger connection by personalizing the message after pasting. Add their name, mention something from their profile, tell them how you found them or just let the message go “as-is” if you just don’t have time. If you have Sales Navigator you might add a tag to track them later.
When sending messages to your connections, it really isn’t any different. The text is longer and you will likely want to customize it a bit more. If you have sales Navigator you really should consider adding tags to track who has received which messages. It avoids some awkward situations. (Have no idea what this paragraph means)
Syncing Auto Text Expander
![]()
If you have multiple computers, it can sync between them using the Import/Export and Cloud Backup capabilities. Use the same Google credentials to install the Google Chrome extension on each machine and it syncs up nicely.
BONUS – Advanced Tips straight from the source
- Add or edit your shortcuts on the fly through the (txt) icon that shows up next to the url bar.
- Shortcuts will auto-capitalize or auto-all-caps! Just capitalize the first letter in a multi-letter shortcut, or type the entire shortcut in caps to trigger all-caps.
- Omnibox (url address bar) now supported! Type ate into the url address bar and hit the Tab key to activate! Then type your regular shortcuts to get live expanded suggestions.
- Clipboard paste macro now supported! Just use the %clip% tag to indicate where to insert the contents of the clipboard at that point in time.
- Date/time macros are supported! Wrap your date format with %d(dateFormat). Please see this for how to format dates in your expanded text. Example: %d(MMMM Do YYYY), and would expand to something like: September 4th 2013.
- Cursor placement is now supported in contenteditable divs! Just include the following special html tag in your expansion where you want the cursor to be placed after triggering the shortcut: <!–?atec?–>
- Add a space to the end of your shortcut if you want it to trigger after typing a space. Line breaks are supported in expanded text now! HTML can also be inserted into content-editable divs like Gmail.
- Backing up your shortcuts with the “Backup” button only makes an extra copy of them in Chrome’s local storage quota. This means if Chrome’s syncing gets messed up, you can restore from your backup, but if you sign out of your browser or uninstall the extension, you will lose your backup. You can get a copy of your shortcuts from the Import/Export dialog.
- Chrome has storage quota limits, so unfortunately you can’t have unlimited shortcuts of any size. Check the limits here.
- The new HTML5 input[type=email] field and a few others don’t allow for detection and setting of the cursor. Instead the extension will have to assume your cursor is at the end of the text and replace from there.
- Saving should sync across all Chrome browsers you login and sync with. First-time user? Here’s a few examples! Refresh your pages to use them.
Learning More
Auto Text Expander is one of a great set of tools we use in our LinkedIn Sales Navigator coaching and training programs. Learn LOTS more with the free Integrated Alliances Sales Navigator InfoGuide, a 4-page PDF packed with strategies for each of the most important areas of Sales Navigator.
